Sunday, December 24, 2023

THE CHRISTMAS ROSE-A POEM I WROTE


I wrote this several years ago
but thought I would share it 
again in case you didn't see it before.


THE CHRISTMAS ROSE
There is a legend old as time 
about the Christmas Rose,
If you've not heard it e'er before~
this is how it goes.

The night sky glowed quite splendidly,
and the girl could see a Star.
It brightly shone upon the land 
and beckoned from afar.

She left her door step quietly 
without a backward glance,
She knew that she must follow it
and take the risk-the chance.

She had heard the shepherds talking 
about the child so near,
That would change the world forever-
that could comfort every fear.

She watched behind a hillock 
as the Magi took their place, 
With their gifts of myrrh & frankincense
& gold in a fine case.

She wanted such a special gift 
for this baby oh-so-dear,
But she was poor, had nothing, 
and she cried a silent tear.

She quickly searched the countryside~ 
a flower was her thought,
But the winter was cold 
& damp & mean-
no flower to be sought.

She earnestly began to weep 
and softly shed each tear,
While an angel watched & marveled 
at the love she held so dear.

"Why are you crying, my child?" she asked 
as she met her on the ground 
"I long to give something to this child
- but nothing have I found."

The angel touched her tears 
where they lay upon the earth,
And a Rose sprung up beneath them-
a green & silent birth.

Now go and give your roses, child,
your gift of heart & tear,
And the Savior child will bless you 
& comfort you, my dear.

She gently picked the roses 
and took them to the place,
Where the baby lay in splendor
in His lowly birthing space.

She stared upon his countenance-
this ragged, humble child,
And He turned his little face up 
and looked at her & smiled.

Yes! That's the story of the Christmas Rose-
it's been heard by many ears,
But the Blessing it brings at Christmas time 
will carry us through the years.
~©Diana Kosmoski~


God bless each and every one of you 
this Christmas Eve, Christmas Day
and all through the holidays
and upcoming year.

Thank you ALL for being such
a beautiful part of my life.
I have made so many friends in blogland
and feel like I know so many of you 
on a deeply personal level.

I have laughed and cried for you
and your families and feel as 
connected to  you as I do to
"real people".
My kids are 
ALL WRONG
when they say 
BLOG FRIENDS
 are not the same as
REAL FRIENDS!

Using an old phrase
coined by SweetCheeks I say
PFFFTTTT!

Merry Christmas my friends! 

your photo name

Sunday, December 17, 2023

NEVER FAIL MICROWAVE CARAMELS....QUICK AND EASY!

  Every couple of years I post

this recipe because people

LOVE IT!

AND- you can't screw it up.

 When I was a kid,

 my mother

often whipped up a batch 

of fudge from scratch

after the chores were done

on a snowy Pennsylvania night.

I make caramels instead.
As you can tell, I love to bake

and make candy.

I don't know how many 

caramel recipes I have tried

over the years.

Some of them called for

stirring for what seemed hours

and then...

they might or might not

"turn out".

These are quick!
Less than 10 minutes from
start to finish AND they
NEVER FAIL 
to set up properly.

I am not sure how these would 
turn out if you have an old
low wattage microwave.
I think most of them are at least
1000 watts now.
I have made them in 1000W,
1200W & 1500W mics
and the timing is the same.
(if you want to double check use
a candy thermometer and it should
read between 240˚-245˚ when done)

Ready?
Get yourself a nice big 
microwave measuring cup.
I use an 8 cup one.
Make sure it is microwave safe.

Before I start-
One warning-
You CANNOT double this recipe.
You would have to make two batches
if you want more.

Everything that is measured out
is in 1/2 cup increments.

Melt 1/2 cup butter.
Remove from microwave.
Add 1/2 cup Karo syrup (I use white Karo),
1/2 cup light brown sugar,
1/2 cup granulated sugar
1/2 cup sweetened CONDENSED MILK
(not evaporated milk)

Stir until mixed and dissolved.
Microwave on high 3-1/2 minutes.
Stir down.


Microwave on high 3-1/2 more minutes.
Remove from mic.  Add 1/2 teaspoon vanilla
Add 1/2 cup chopped nuts-if desired- I don't.
Stir until few air bubbles remain.


Pour into 8x8 HEAVILY buttered dish.
Refrigerate just until set.


Cut into squares.
(Sometimes I pull the whole works
out of the pan and cut the squares
using kitchen scissors).

NOTE:  Cut before these are completely
cold and hard.  If they are too hard,
let them warm up for a while
then you will be able to cut them.

You can wrap these if they last long enough.
Ours never seem to make it to the
wrapped stage!


If you do have some left to wrap
they make a perfect little 
take-along gift in a pretty 'card box',
like the post before this with the fudge in it!

I hope you have a most
wonderful, blessed
SUNDAY!!!!

CARAMEL RECIPE:
1/2 Cup real butter
1/2 Cup KARO syrup
1/2 Cup light brown sugar
1/2 Cup graulated white sugar (not confecionery sugar)
1/2 Cup Sweetened Condensed Milk (Not Evaporated Milk)
        (I use the Eagle Brand-It's better than other kinds for this particular recipe)

DIRECTIONS:
Use a LARGE Pyrex (or other) Measuring cup (mine is 8 cups)
WARNING- MAKE SURE IT IS MICROWAVE PROOF!

Melt 1/2 cup of butter in microwave.
Remove from microwave.

Stir in:
KARO syrup, light brown sugar, white sugar, Sweented condensed milk.
Stir until well blended and sugars are dissolved.
Microwave on high for 3-1/2 minutes.

Remove from microwave.
Stir down.

Put back in microwave.
Microwave on high for 3-1/2 minutes.

Remove from Microwave.
Add 1/2 teaspoon pure vanilla.
Add nuts at this point if so desired.

Stir well until air bubbles are just about all gone.

Pour into HEAVILY BUTTERED 8x8 pan and put in fridge.
Let them set but not get super hard. If they get too hard they will be too hard to cut.  If that happens put them in a warm oven for a few minutes until they soften slightly.

Cut into squares while still soft.  
Sometimes I pull the whole thing out of the pan and use
kitchen shears to cut into strips and then squares from the strips. 
Wrap squares in wax paper squares and twist ends shut.

If you use DARK KARO SYRUP you get a darker caramel but we prefer the lighter ones.
your photo name

Wednesday, December 13, 2023

PEANUT BUTTER FUDGE-MY CHRISTMAS REMINDER FOR YOU~

Do you have 
someone you need to pop in
and visit over the Holidays?
Do you need just a sweet little
something to give them?
This is 
THE EASIEST HOMEMADE
PEANUT BUTTER FUDGE
ever.
I wish I could tell you where
I got the recipe but I can't remember.
So...
You know those boxes that
Christmas cards come in?

Here's how to take the box below
and turn it into a special
gift.


Don't you hate to throw them away
because they have such pretty
"faces"?
They make wonderful little
Candy Boxes.

Open the box and line it with tin foil.
Butter the tin foil.
Then make this:
In pan over medium heat melt

2 sticks of butter
When melted stir in 
1 cup peanut butter, creamy or crunchy.


Like this.
Stir in one teaspoon REAL vanilla.


Add 2-3/4 cups CONFECTIONERY SUGAR
(not granulated)

(That old tin scoop belonged to my Mom-Good Housekeeping 1954)

I beat it quickly with a hand mixer
(it sets up fast) 
and then pour it into the 
buttered foil lined box.

Put it in the fridge to harden
and as soon as it sets up
lift it out, toss the tinfoil away,
 and wrap it in 
parchment paper.
Then wrap it with a piece
of ribbon and place it
back in the box.

 
I pick up knives all year here and there
and include one in each box.

The fudge stays fresh 
until they cut it.

Put the lid on and it presents
like this when opened.

Recipe:
SMOOTH AND EASY
PEANUT BUTTER FUDGE
2 sticks butter
1 cup peanut butter
1 teaspoon vanilla
2-3/4 cups confectionery sugar
In saucepan:
Melt butter
Stir in peanut butter and vanilla.
Use hand mixer and quickly
mix sugar in. It sets up fast.
Place in tinfoil lined box and
set in fridge until hard.
This is the smoothest peanut
butter candy I have ever made.
This recipe makes two card boxes 
full OR 1 8x8 buttered pan.
It's quick, easy and just
a sweet little surprise.

Save a few pieces for your friends.


your photo name

Wednesday, November 29, 2023

TAKE A GINGER BOY WITH YOU--AND I DON'T MEAN YOUR RED-HEADED NEIGHBOR~

I have done this post

a  few times over the years.

Several people wrote and told me

how much the loved the idea.


I thought I would post before it

gets any later in the season--

in case you want make these for 

your own home.

I have been doing this since my

own kids were small.


You know how a front door says 

WELCOME

when you come in?

By the way-

Those sleigh bells are off the horses my 

father drove as a young man.

So -there's my 

Happy Hello!

BUT I like my door to say

GOOD-BYE

when someone leaves, too.

And I like to say it NICELY

Unlike some people that will say-

Don't let the door hit you in the butt on the 

way out.

How do I do that?

I let my visitors take a little memento

of their visit with them.

It is called 

Cut and Run Take

Here they are! 

My sweet little

GINGERBREAD BOYS

hanging in a row.


Here's how to make this 

sweet little door hanging.

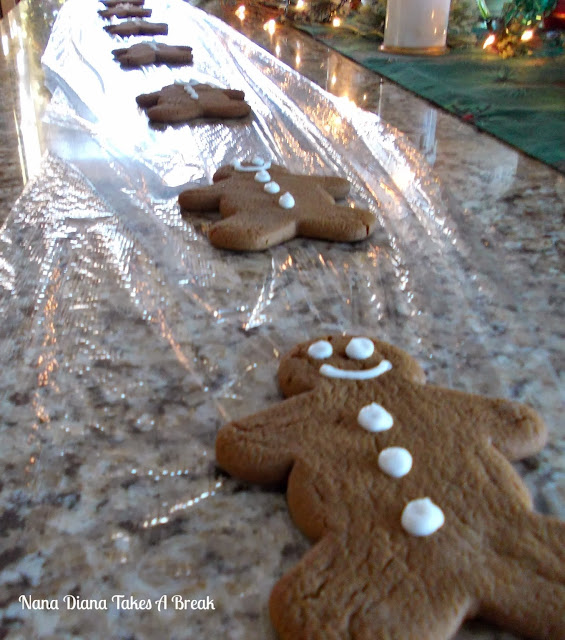
Roll out Saran Wrap about 2 feet longer 

than the side of your door.

Lay your Gingerbread Boys in a line 

on the center of the plastic wrap.

leaving about 4-6" between them.

You could also do this with any sturdy

cookie- like a sugar cookie cut 

like a snowflake or star.

Flip each boy upside down 

making sure that they

are still in the center

of the saran wrap.


Pull the plastic wrap to the back

overlapping it so they are enclosed 

all the way around.

That way they stay nice and fresh

as well as being encased.


Gently flip them over and using ribbon

tie a knot ABOVE and below EACH one.

Hang some children's scissors on

some curly ribbon from the top

of the door frame

to cut the saran wrap.

When you cut them apart 

you will cut between the ribbons 

leaving each one fully encased 

in plastic wrap.


Here I am making a cut between the ties.

You start with the bottom one and 

each person can cut off 

A GINGERBREAD BOY 

to take along when they leave.


I hang them on a nail 

hidden on top of the door jamb.

shhhhh-MyHero hates nails anywhere

I dressed the top 

with some greenery and red balls.


I love  Gingerbread Boys, don't you?

Sometimes I feel sorry for them though.

Poor things.

pinterest image

The one on the right hears about like 

my hubby does-especially when it comes

to something I am saying 

of great importance!


Now- get in that kitchen and start baking!

As for me..

Well, I am trying not to BAKE

so that I don't EAT

Gingerbread Boys!


OH!  And this idea works really cute with


SNOWFLAKE CUTOUTS


instead of 

Gingerbread boys.


Have a Wonderful Wednesday !

your photo name